>>
30-MINUTE MEALS! Get the email series now →


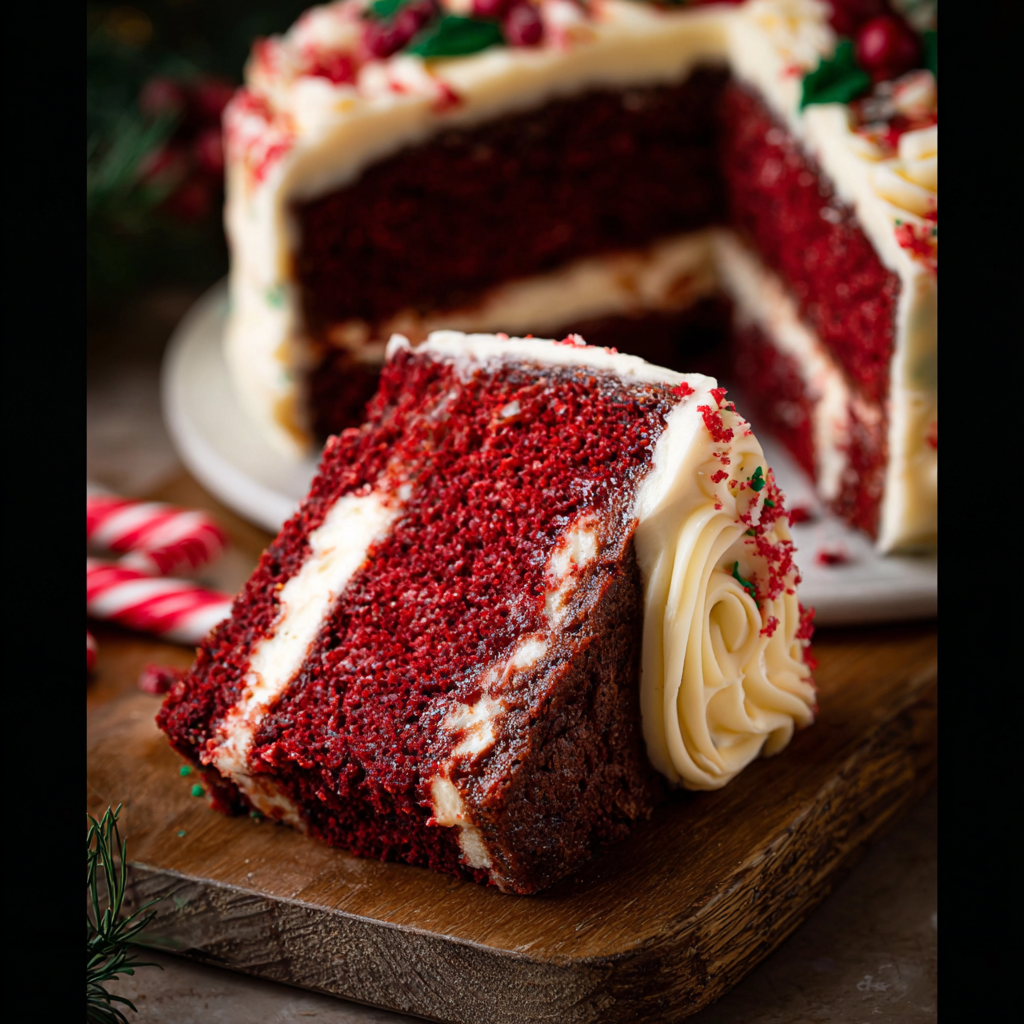
A festive red velvet cake layered with a silky cream cheese cheesecake and finished with classic cream cheese frosting — the perfect centerpiece for holiday celebrations.

This Red Velvet Christmas Cake has been our holiday centerpiece for as long as I can remember. I first combined a baked cheesecake into a red velvet cake on a blustery December afternoon when I wanted something dramatic that still felt familiar — the tang of cream cheese, the soft crumb of red velvet, and the bright pop of holiday color. The first time I served it my table fell silent for a beat before everyone dove in; the texture contrast between the dense, silky cheesecake and the tender, cocoa-kissed red velvet crumb makes each slice feel like an event.
I discovered this combination after experimenting with leftover holiday ingredients and a stubborn craving for something creamy and elegant. What makes it special is the way the cheesecake anchors the cake: it supplies a luxurious mouthfeel and a gentle tang that balances the sweet, chocolatey cake and the sweet, vanilla-forward frosting. This cake becomes more than dessert — it’s a memory maker. Serve it at a winter gathering and watch the smiles spread across the room.
On the first year I made this cake, my niece insisted we take a family photo with it before anyone touched a slice. That kind of reaction is common — people remember both the look and the layers of flavor. Over the years I’ve learned small tricks that make assembly easier, like chilling the cheesecake until firm so it slices cleanly and using gel food coloring for vivid, consistent red without watering down the batter.
My favorite aspect is how the cheesecake surprises guests — they often expect a standard layered cake, and the creamy center elevates every bite. Years ago I brought this to a neighborhood cookie swap and returned to find only crumbs and a stack of napkins — a nice validation of the rich, balanced flavors in this combination.
Store the assembled cake covered loosely with plastic wrap or in a cake carrier in the refrigerator for up to 4 days. For longer storage, slice into individual portions and wrap each slice tightly in plastic and foil before freezing; frozen slices keep well for up to 2 months. To reheat, thaw overnight in the fridge and bring to room temperature for 30–60 minutes before serving. Avoid leaving slices at room temperature for extended periods because of the cream cheese filling.
For a slightly lighter tang, substitute Greek yogurt for sour cream at a 1:1 ratio. If you prefer butter over oil, use 3/4 cup melted unsalted butter plus 1/4 cup oil for similar moisture. To make it egg-free, use commercial egg replacer per package directions (texture will be slightly different). For a natural red color, use concentrated beet powder, but expect a subtler hue and a slightly earthier note.
Serve slices with lightly whipped cream and fresh winter berries for brightness, or dust with a little cocoa or finely grated white chocolate for an elegant finish. Pair with hot coffee, espresso, or a cocoa cocktail for adults. For a holiday buffet, place on a cake stand and garnish with sugared cranberries and rosemary sprigs for a festive wreath effect.

Red velvet has roots in Southern American baking traditions, historically prized for its tender crumb and subtle cocoa flavor. It became a specialty cake in American mid-century bakeries and is now a holiday favorite for its dramatic color and nostalgic appeal. Combining it with a cheesecake layer is a modern twist that blends the comfort of a classic celebration cake with the rich, custardy texture of baked cheesecakes often found in European and American traditions.
In winter, embellish the cake with spiced whipped cream (a pinch of cinnamon and nutmeg) and seasonal fruits like pomegranate arils. For summer celebrations, swap the frosting for a lighter mascarpone-whipped cream and top with fresh strawberries. For Valentine's or other red-themed occasions, keep the classic look but add chocolate shards and edible gold dust for extra drama.
Make the cheesecake two days ahead and chill it thoroughly to make assembly day simple. Bake the cake layers a day ahead and keep them wrapped in plastic to maintain moisture. On the event day, assemble and frost 2–3 hours before serving so flavors meld and the frosting sets. Keep a spare tube of gel coloring and extra powdered sugar on hand for last-minute touch-ups.
Whether you’re celebrating Christmas, a winter birthday, or just want a show-stopping dessert, this layered cake delivers both visual impact and comforting flavors. Enjoy the process, and don’t be surprised if it becomes your new holiday classic.
Chill the baked cheesecake completely before assembling to prevent it from shifting when stacking the cake layers.
Use gel food coloring for a vibrant red without adding liquid; a little goes a long way.
Warm your knife under hot water and dry between slices for clean cuts through the cheesecake layer.
Sift powdered sugar into the frosting to avoid lumps and achieve a silky texture.
This nourishing red velvet christmas cake with a cream cheese cheesecake layer recipe is sure to be a staple in your kitchen. Enjoy every moist, high protein slice — it is perfect for breakfast or as a wholesome snack any time.
This Red Velvet Christmas Cake with a Cream Cheese Cheesecake Layer recipe makes perfectly juicy, tender, and flavorful steak every time! Serve with potatoes and a side salad for an unforgettable dinner in under 30 minutes.
Preheat oven to 325°F. Beat cream cheese, sugar, and flour until smooth. Add vanilla and egg, mix briefly. Pour into a parchment-lined 9-inch springform pan and bake 30–35 minutes until set at the edges and slightly jiggly in the center. Cool in oven with door cracked, then chill completely.
Preheat oven to 350°F. Whisk dry ingredients. In another bowl whisk oil, sugar, vinegar, vanilla, and eggs. Alternate adding dry mixture with buttermilk, fold in sour cream and gel coloring until smooth and even in color.
Divide batter between two greased 9-inch pans and bake 22–28 minutes until a toothpick shows moist crumbs. Cool in pans 10 minutes then transfer to racks to cool completely.
Place one cake layer on a plate, spread a thin layer of frosting, gently set the chilled cheesecake on top (release from springform), then top with the second cake layer. Chill 30 minutes before final frosting to stabilize.
Beat butter and cream cheese until fluffy. Gradually add sifted powdered sugar and vanilla until smooth and pipeable. Adjust consistency with a tablespoon of milk if too thick.
Apply a crumb coat, chill 20 minutes, then finish with a final layer of frosting. Smooth edges with an offset spatula. Refrigerate at least 1 hour to set before slicing.
Use a hot, dry knife and wipe between cuts for clean slices through the cheesecake. Allow slices to sit at room temperature for 5–10 minutes before serving for optimal texture.
Last Step: Please leave a rating and comment letting us know how you liked this recipe! This helps our business to thrive and continue providing free, high-quality recipes for you.
Leave a comment & rating below or tag
@royalrecipe on social media!

Learn how a 5-minute prep transforms a whole garlic bulb into silky, caramelized cloves in the air fryer. Perfect as a spread, mix-in, or flavor booster that elevates weeknight meals and party plates.

A bright, spicy and slightly sweet salmon dish finished with a creamy bang bang sauce. Ready in 15 minutes, it delivers restaurant flavor with weeknight ease.

A comforting, protein-packed twist on classic pot pie flavors, transformed into a creamy, one-pot soup that is perfect for weeknights and meal prep.
Leave a comment & rating below or tag @royalrecipe on social media!
Enjoyed this recipe? Share it with friends and family, and don't forget to leave a review!
This recipe looks amazing! Can't wait to try it.
Comments are stored locally in your browser. Server comments are displayed alongside your local comments.

Join to receive our email series which contains a round-up of some of our quick and easy family favorite recipes.