
No-Bake Christmas Peppermint Pie

A festive, creamy no-bake peppermint pie with an Oreo crust, bright pink swirl, and crunchy peppermint garnish — perfect for holiday gatherings.

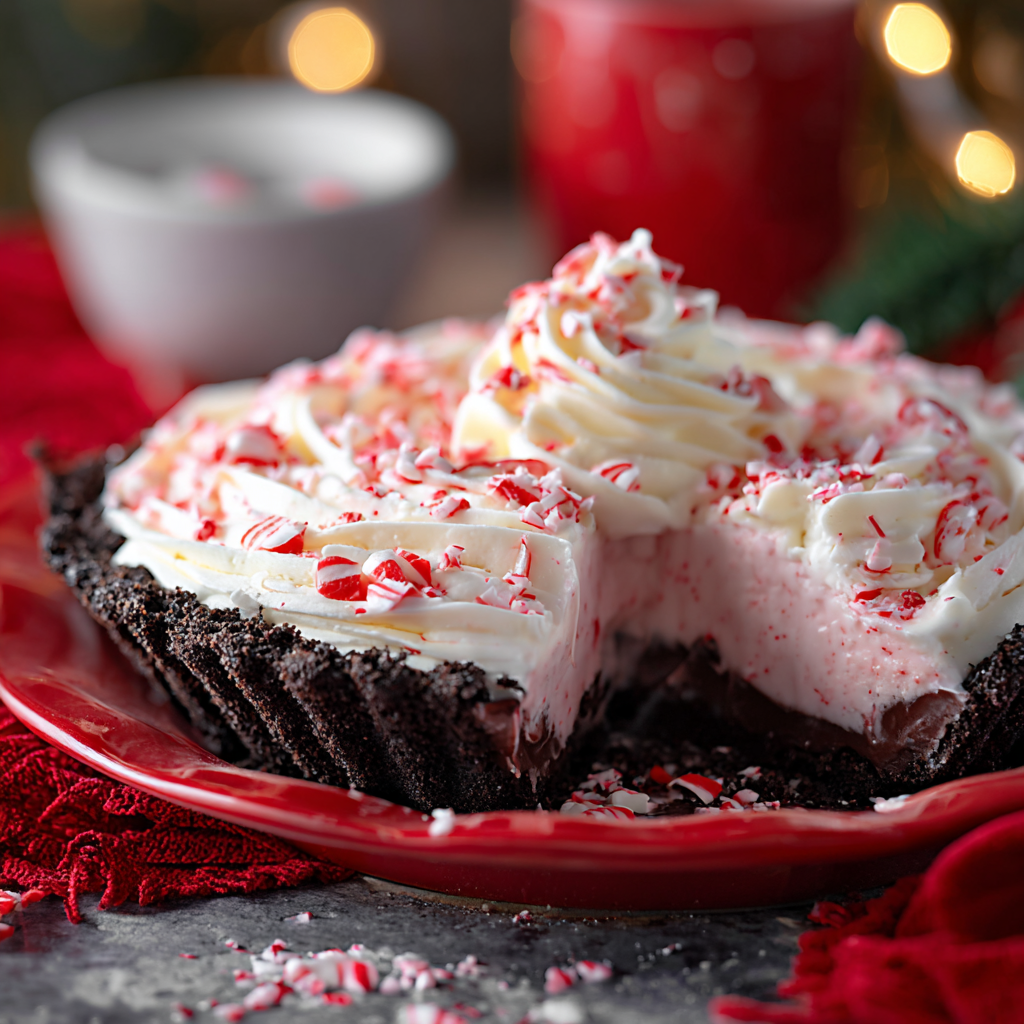
This no-bake peppermint pie is my go-to holiday centerpiece when I want something that looks festive but doesn’t require the oven. I first pulled this together one December when the oven was already claimed by roasted turkey and a tray of baking cookies; the result was unexpectedly elegant — cool, creamy filling with a crisp chocolate cookie shell and just enough peppermint crunch to feel special. The peppermint is bright but not overpowering: the vanilla and cream cheese keep the filling smooth and slightly tangy, while the whipped cream lightens the texture so it slices cleanly.
I learned to balance the peppermint early on after a first version that tasted like candy cane toothpaste. A touch of peppermint extract, crushed candy for texture, and a few drops of red food color give that holiday look without overwhelming the palate. Making this pie became a family tradition; kids love the crushed candy garnish and adults appreciate how it pairs with coffee after a big meal. It’s quick to assemble and, because it sets in the fridge, it’s a great make-ahead dessert for busy holiday hosts.
Why You'll Love This Recipe
- Ready with about 20 minutes active prep time and simply chilling for 4 hours — perfect for last-minute holiday plans yet excellent for make-ahead timing.
- Uses pantry and fridge staples: store-bought Oreo pie crust, cream cheese, heavy cream, powdered sugar, and peppermint candy — no specialty shopping required.
- The texture is creamy and light: whipped heavy cream folded into softened cream cheese and powdered sugar makes a filling that holds shape but melts on the tongue.
- Visually festive: a gentle pink swirl with specks of crushed peppermint on top makes an impressive holiday presentation without fussy decoration.
- Kid-friendly and crowd-pleasing: younger guests love the sweetness and crunch while adults enjoy the refreshing peppermint note paired with a rich chocolate crust.
- Flexible for diet tweaks: swap the crust or use a dairy-free whipped topping for alternates, making it adaptable for several dietary needs.
In my kitchen this pie became the dessert everyone asked me to bring. I remember one year when a snowstorm delayed guests and the chilled pie arrived perfectly set; my grandmother declared it the best peppermint dessert she’d ever had. The combination of ease and festive flair is why it keeps reappearing at holiday tables.
Ingredients
- Oreo pie crust: Use one store-bought 9-inch Oreo pie crust for a dependable chocolate base. I like Nabisco or store brand for consistent thickness and flavor; pre-baked cookie crusts save time and remain crisp after chilling.
- Vanilla extract: 2 teaspoons of pure vanilla extract (I prefer McCormick) to round out the peppermint and add depth — avoid imitation vanilla if you want a clean finish.
- Cream cheese: Two 8-ounce packages at room temperature for the smoothest filling. Full-fat cream cheese gives the creamiest mouthfeel; soften it for at least 30 minutes before beating.
- Crushed peppermint candy: 1/2 cup plus extra for garnish. Use store-bought candy canes or peppermint starlights — pulse coarsely in a food processor for a mix of fine dust and larger bits for crunch.
- Powdered sugar: 1 1/2 cups, sifted to avoid lumps and to blend seamlessly into the cream cheese.
- Peppermint flavoring: 1 teaspoon of peppermint extract (food-grade) for a clean cool note; start with less and add to taste because concentrates vary in strength.
- Red food color: 10 drops to get a soft rosy tint — gel color works well and you only need a little to avoid thinning the filling.
- Heavy whipping cream: 1 cup, chilled, whipped to soft peaks before folding in to lighten the mixture.
- Whipped topping for garnish: One 8-ounce tub (like Cool Whip), thawed, used to pipe a decorative border if desired.
Instructions
Bring dairy to room temperature: Remove the two packages of cream cheese from the fridge 30–60 minutes ahead so they soften. Room-temperature cream cheese whips up smooth and avoids lumps in the filling; if too cold, you’ll have a grainy texture even after beating. Crush the peppermint: Place peppermint candy in a zip-top bag and bash with a rolling pin, or pulse 6–8 times in a food processor for a mix of fine powder and larger shards. Reserve about 2 tablespoons for garnish so the top has large, pretty pieces. Beat the cream cheese and sugar: Using a stand mixer or hand mixer, beat the softened cream cheese on medium speed until smooth, about 1–2 minutes. Gradually add the 1 1/2 cups powdered sugar and 2 teaspoons vanilla, then beat another 1–2 minutes until silky. Scrape bowl sides with a spatula to ensure even mixing. Flavor and color: Mix in the 1 teaspoon peppermint extract carefully — taste and adjust if your extract is strong. Add 10 drops red food color and blend until a soft rosy hue forms; gel color disperses faster and requires fewer drops. Whip the cream: Chill a metal mixing bowl and beaters for 10 minutes, then whip 1 cup heavy cream to soft peaks on medium-high speed. Soft peaks will lift slightly and curl when the beaters are lifted; do not over-whip or you’ll get grainy texture when folding. Fold to lighten: Gently fold one-third of the whipped cream into the cream cheese base to loosen it, then fold in the remaining cream in two additions. Use a rubber spatula and fold with a gentle motion to keep volume. Fold in 1/2 cup crushed peppermint until speckled evenly. Assemble the pie: Pour the filling into the Oreo crust and smooth the top with an offset spatula. Chill uncovered for 30 minutes, then cover loosely with plastic wrap and refrigerate at least 4 hours, ideally overnight, until firmly set. Top and garnish: Before serving, spread the thawed whipped topping or pipe decorative borders. Sprinkle remaining crushed peppermint over the center and along the edge. Use reserved larger shards for an attractive finish.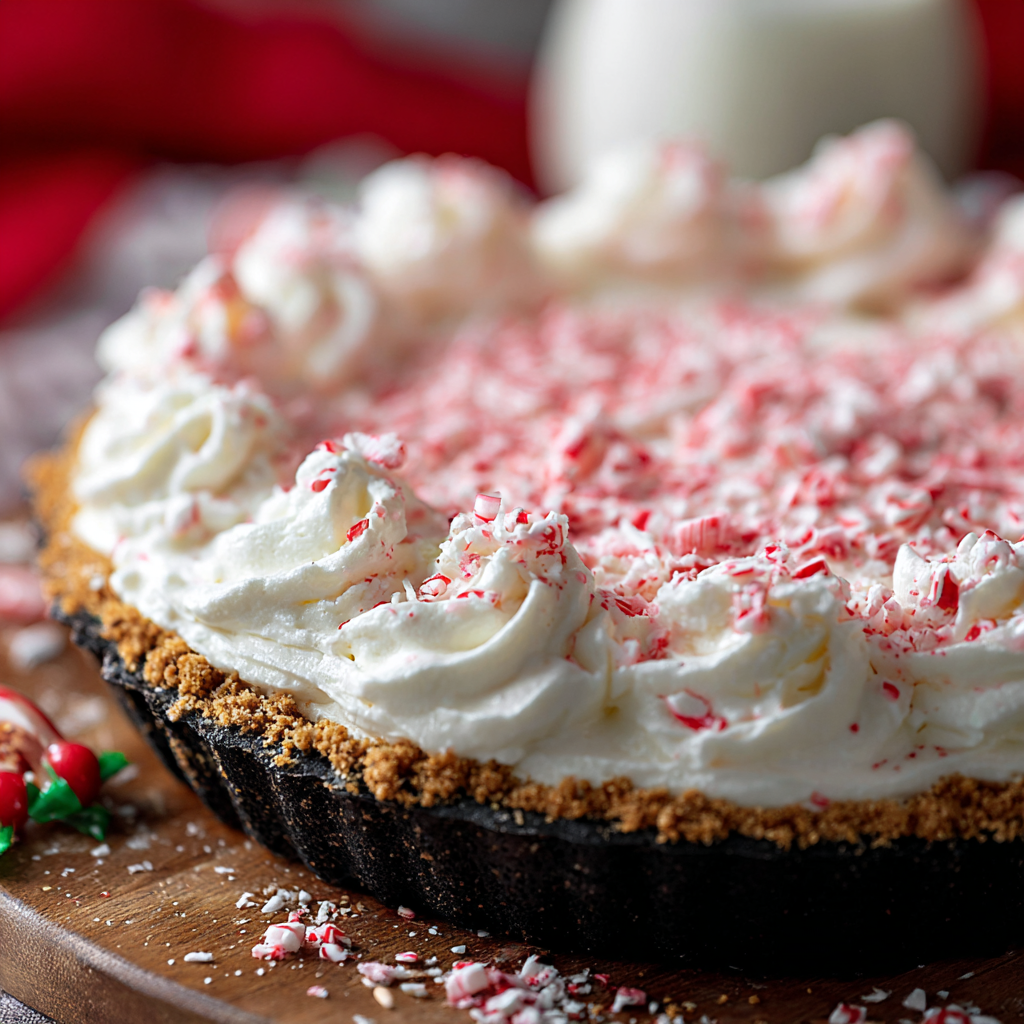
You Must Know
- This dessert is best kept chilled and can be made up to 24 hours in advance — chilling overnight improves sliceability and flavor melding.
- Freezes well for up to 2 months; thaw in the refrigerator overnight and add fresh crushed candy before serving.
- High in dairy and sugar — each slice is rich and best enjoyed in small portions after a heavy meal.
- Allergens: contains dairy and wheat (in the cookie crust); swap crust for a gluten-free cookie base if needed.
- Textural cues: filling should be glossy and hold shape when sliced; if too soft, allow additional chilling time.
I love how reliable this pie is at parties — it’s one of those dishes where people immediately comment on the balance of creaminess and peppermint crunch. My favorite memory is bringing this to a neighbor gift exchange; the host took one bite and asked if I could teach her to make it for her family holiday the next weekend. That instant approval never gets old.
Storage Tips
Store the pie covered in the refrigerator for up to 3 days for best texture and flavor. Use an airtight pie container or a deep cake carrier to protect the surface from absorbing other fridge aromas. For longer storage, wrap the pie tightly in plastic wrap and then foil and freeze up to 2 months; thaw in the refrigerator for 12–24 hours before serving. If you pipe whipped topping, add it fresh after thawing for best visual appeal. When reheating, this is strictly a chilled dessert — do not heat; instead, let thaw slowly in the fridge to maintain cream structure.
Ingredient Substitutions
If you need a gluten-free option, substitute a gluten-free chocolate cookie crust or make one with crushed gluten-free Oreos and melted butter pressed into a 9-inch pan. For a lighter version, use light cream cheese and whipped light cream, though texture will be less rich and may require more chilling time. To avoid artificial dyes, omit the red coloring and add a few drops of natural beet juice for color, though flavor and hue will vary. For dairy-free versions, use dairy-free cream cheese and a non-dairy whipped topping labeled to whip; results are slightly different but still festive.
Serving Suggestions
Serve chilled slices on a simple white plate to let the pink filling and peppermint flakes pop. Pair with a cup of dark roast coffee or a lightly spiced hot chocolate for contrast. Garnish with a small sprig of fresh mint or a dusting of cocoa powder for a more adult presentation. This pie also works well as part of a dessert board with brownies and cookies: cut smaller slices so guests can sample multiple sweets. For a show-stopping centerpiece, pipe rosettes of whipped topping around the edge and sprinkle large peppermint shards in the center.
Cultural Background
While not a historical traditional recipe, this pie draws on classic North American holiday flavors: peppermint and chocolate have long been paired in winter confections. The idea of no-bake chilled desserts became particularly popular in mid-20th-century America with the rise of convenience ingredients like pre-made crusts and whipped toppings. The combination of cream cheese-based fillings and crunchy candy garnish is a modern holiday adaptation that captures the nostalgia of candy canes and cookie flavors in a family-style dessert.
Seasonal Adaptations
For winter gatherings, keep the peppermint and add crushed shortbread or ginger snaps into the crust for spice. In spring, swap peppermint for lemon extract and use a graham cracker crust instead, keeping the no-bake method intact. For a more elegant holiday version, omit the bright pink and add white chocolate shavings and a peppermint ribbon around the plate. During family brunches, serve smaller tartlet portions in individual tart shells using the same filling to make handheld treats.
Meal Prep Tips
Make the filling up to 24 hours ahead and hold it in the refrigerator; press and chill the crust separately, then assemble a few hours before serving. Portion the crushed peppermint in small containers and top just before serving to retain crunch. Use a piping bag for quick, uniform rosettes from the whipped topping. If transporting, keep the pie in a cooler with ice packs to ensure it remains chilled until serving time.
Final thought: this pie is one of those deceptively simple holiday solutions — minimal active time, big festive payoff, and a texture that delights every age. Make it your own by adjusting the peppermint intensity, swapping crusts, or experimenting with garnishes, and you’ll have a dessert that becomes part of your seasonal rituals.
Pro Tips
Soften cream cheese to room temperature for at least 30 minutes to ensure a lump-free, silky filling.
Whip heavy cream to soft peaks — over-whipping will make the filling grainy when folded.
Pulse peppermint candy coarsely so you have both powder for flavor and larger shards for crunch.
Chill the pie at least 4 hours or overnight for the best texture and clean slices.
This nourishing no-bake christmas peppermint pie recipe is sure to be a staple in your kitchen. Enjoy every moist, high protein slice — it is perfect for breakfast or as a wholesome snack any time.
Tags
No-Bake Christmas Peppermint Pie
This No-Bake Christmas Peppermint Pie recipe makes perfectly juicy, tender, and flavorful steak every time! Serve with potatoes and a side salad for an unforgettable dinner in under 30 minutes.
Ingredients
Crust
Filling
Topping & Garnish
Instructions
Soften cream cheese
Remove both 8-ounce cream cheese packages from the refrigerator and let sit at room temperature for 30–60 minutes so they soften fully for smooth mixing.
Crush peppermint candy
Place peppermint candy in a freezer bag and crush with a rolling pin or pulse in a food processor to create a mix of fine powder and larger shards; reserve a few larger pieces for garnish.
Beat cream cheese and sugar
In a mixer, beat softened cream cheese on medium until smooth, then gradually add 1 1/2 cups sifted powdered sugar and 2 teaspoons vanilla until silky, scraping the bowl as needed.
Add flavor and color
Mix in 1 teaspoon peppermint extract carefully, tasting as you go, then add 10 drops red food color to reach a soft pink hue; mix until evenly colored.
Whip heavy cream
Chill beaters and a bowl briefly, then whip 1 cup heavy cream to soft peaks — it should hold a gentle curl when the beaters are lifted.
Fold whipped cream into base
Fold one-third of the whipped cream into the cream cheese base to loosen it, then fold in the rest gently to keep airiness; fold in 1/2 cup crushed peppermint.
Assemble and chill
Spread the filling into the Oreo crust, smooth the top, then chill uncovered 30 minutes before covering; refrigerate at least 4 hours or overnight until set.
Decorate and serve
Top with thawed whipped topping, pipe rosettes if desired, and sprinkle reserved crushed peppermint shards over the pie before slicing and serving chilled.
Last Step: Please leave a rating and comment letting us know how you liked this recipe! This helps our business to thrive and continue providing free, high-quality recipes for you.
Nutrition
Did You Make This?
Leave a comment & rating below or tag
@royalrecipe on social media!
Categories:
You might also like...

5-Minute Air Fryer Roasted Garlic Magic That Wows
Learn how a 5-minute prep transforms a whole garlic bulb into silky, caramelized cloves in the air fryer. Perfect as a spread, mix-in, or flavor booster that elevates weeknight meals and party plates.

Bang Bang Salmon Made Perfect in Just 15 Minutes
A bright, spicy and slightly sweet salmon dish finished with a creamy bang bang sauce. Ready in 15 minutes, it delivers restaurant flavor with weeknight ease.

High Protein Chicken Pot Pie Soup
A comforting, protein-packed twist on classic pot pie flavors, transformed into a creamy, one-pot soup that is perfect for weeknights and meal prep.
Did You Make This?
Leave a comment & rating below or tag @royalrecipe on social media!
Rate This Recipe
Share This Recipe
Enjoyed this recipe? Share it with friends and family, and don't forget to leave a review!
Comments (1)
This recipe looks amazing! Can't wait to try it.
Comments are stored locally in your browser. Server comments are displayed alongside your local comments.

Hi, I'm Riley!
What's Popular
30-Minute Meals!
Join to receive our email series which contains a round-up of some of our quick and easy family favorite recipes.