>>
30-MINUTE MEALS! Get the email series now →


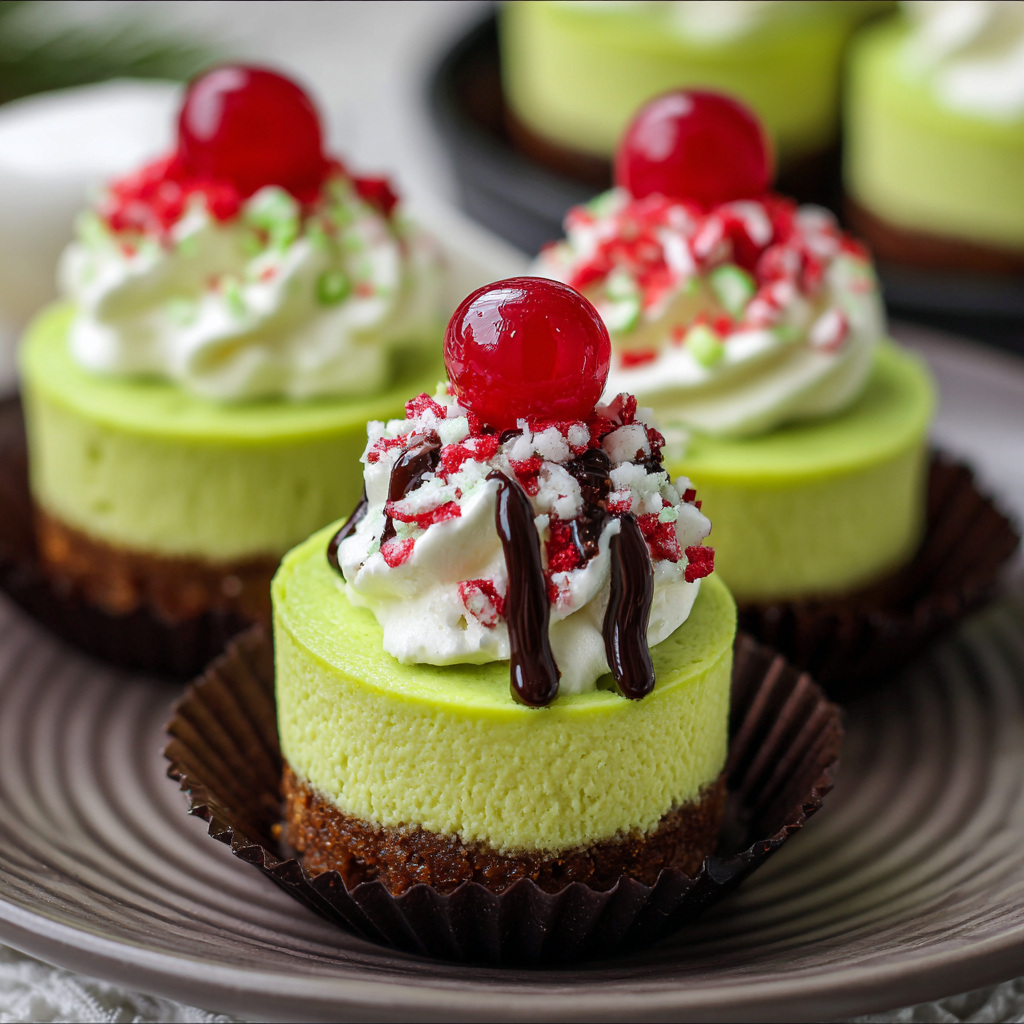
Tiny, festive cheesecakes dyed neon green and nestled in an Oreo crumb crust — perfect for holiday parties and whimsical dessert tables.

This batch of Grinch Mini Cheesecakes has been my holiday party secret for years — a playful, bright dessert that always gets delighted double-takes. I first developed this version when my niece asked for something "silly and green" for a holiday bake-off. I wanted a small, fuss-free treat that looked dramatic but tasted classic: creamy, tangy cheesecake balanced by a crunchy chocolate cookie base. The vibrant neon color makes them instantly festive, while the familiar Oreo crust gives that crowd-pleasing chocolate crunch that both kids and adults love.
What makes these tiny cheesecakes special is the contrast of textures and the ease of assembly. Each mini is just the right size for a single bite or two, so guests can sample other desserts without feeling guilty. I keep the technique simple — a short food-processor step for the crust and a quick electric-mixer whip for the filling — which means you can prepare a dozen in under an hour of active work. These are the kind of baked good that becomes part of a family tradition: bright, fun, and reliably delicious.
In my house, these became a holiday staple after one big family gathering where neighbors asked for the recipe twice. The bright color always sparks conversation, and I love how a simple swirl of whipped cream makes each mini feel indulgent. Over the years I’ve refined the texture so the centers stay just slightly jiggly after baking — that’s the cue for a silky, not curdled, finish.
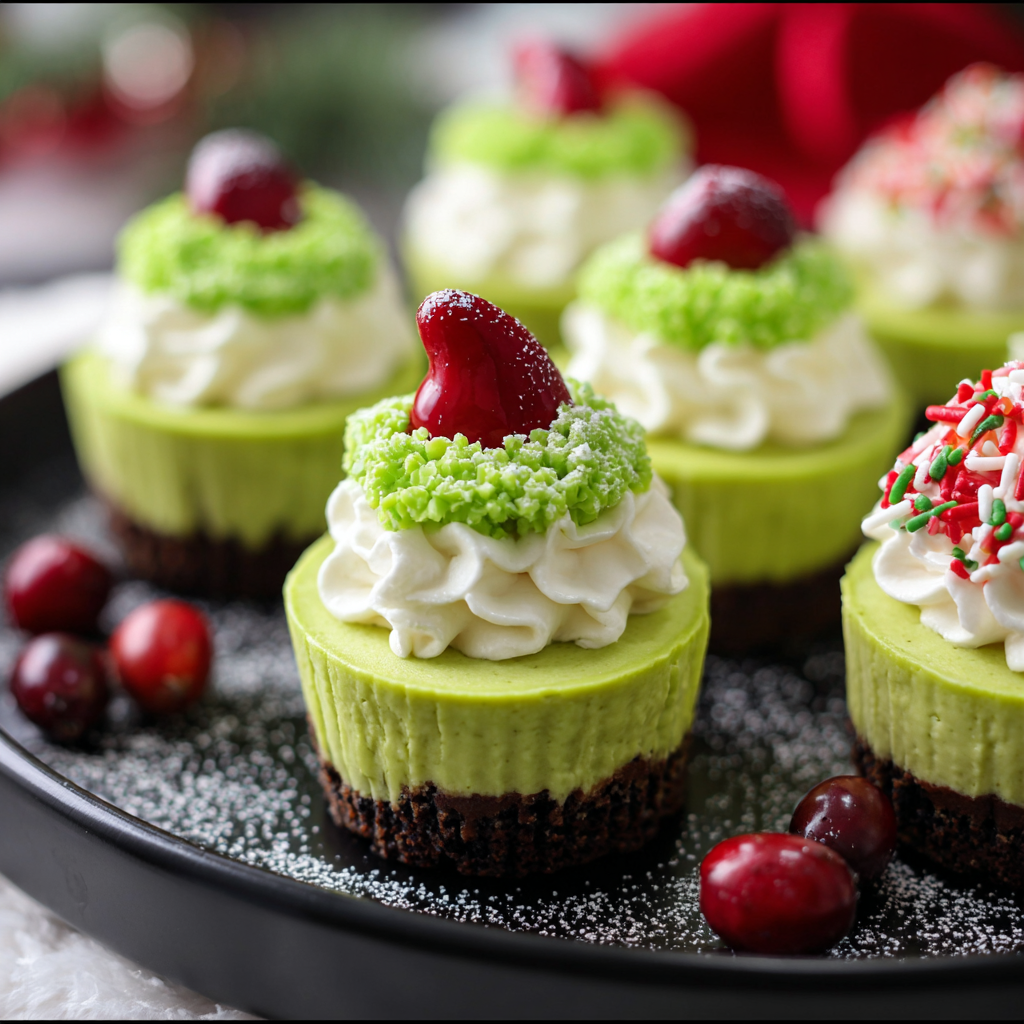
I love how these tiny desserts become a conversation starter — people ask what gives the color and are always surprised at the delicate cheesecake texture. They’re perfect for potlucks because they travel well sealed in a shallow container, and the individual portions mean no cutting or crumbling on-site. For me, the best part is watching kids’ faces when they see the Grinch-green centers next to the chocolate base.
Store cooled cheesecakes in a single layer in an airtight container in the refrigerator for up to 4 days. If stacking is necessary, separate layers with parchment paper to protect delicate whipped cream or sprinkles. For longer storage, freeze uncovered until firm, then wrap the tray tightly in plastic and move to a freezer bag or rigid container for up to 3 months. To serve from frozen, thaw overnight in the fridge and add fresh whipped cream and sprinkles just before presenting; this prevents sogginess and keeps the texture bright.
If you need a gluten-free option, swap Oreos for certified gluten-free chocolate sandwich cookies or use finely ground gluten-free chocolate graham crackers. For a lighter crust, reduce butter by 1/2 tablespoon but press very firmly so the base holds. Use low-fat cream cheese for a lighter filling, though the texture will be slightly less rich. For a non-dairy version, seek a full-fat dairy-free cream cheese alternative and vegan butter — note that setting and flavor will differ slightly, and you may want to add a teaspoon of lemon juice to mimic the tang of dairy.
Present these on a festive platter with contrasting garnishes: a small red candy or cherry on top to reference the Grinch’s heart, or use red sanding sugar for color contrast. Pair with hot cocoa or spiced coffee for cold-weather gatherings. For adult parties, serve alongside a platter of salted nuts or espresso cookies to contrast the sweet creaminess. These also make charming favors — place one in a mini cupcake box tied with ribbon for guests to take home.
For other seasons, change the color and decorations: pastel green or mint for spring brunches, bright yellow for summer parties, or deep emerald for elegant winter events. Swap holiday sprinkles for chopped toasted nuts or citrus zest to shift flavor profiles. You can also infuse the filling with a teaspoon of peppermint extract for a holiday twist or a tablespoon of melted white chocolate for extra richness.
Make the crust and filling the day before to streamline serving day: prepare the crusts, chill briefly to set, then whip the filling and store in the refrigerator in an airtight bowl. On the day you’ll serve, fill cups and bake just before guests arrive, or bake the night before and chill. When transporting, freeze slightly so they are firm, pack in a shallow container cushioned with towels, and refreeze lightly on arrival before finishing with whipped cream.
These Grinch Mini Cheesecakes are equal parts nostalgic and modern — easy enough for a busy cook, charming enough to become a tradition. Whether you’re making them for kids, neighbors, or a festive potluck, they deliver flavor, fun, and just the right amount of holiday mischief.
Bring cream cheese and eggs to room temperature before mixing for a smooth filling without lumps.
Use gel food coloring for vivid color; add color gradually to avoid overshooting the shade.
Don't overmix after adding eggs to prevent incorporating too much air and cracking.
Press the crust firmly into the liners so the base holds when serving.
Chill fully before adding whipped cream to keep decorations neat and stable.
This nourishing grinch mini cheesecakes recipe is sure to be a staple in your kitchen. Enjoy every moist, high protein slice — it is perfect for breakfast or as a wholesome snack any time.
Yes — chill the cheesecakes for at least 2 hours, preferably overnight, to ensure they are firm. If baking ahead, decorate with whipped cream just before serving.
Use gel or paste food coloring for the brightest neon hue without adding extra liquid that can affect texture.
They freeze well for up to 3 months. Thaw overnight in the refrigerator and add fresh toppings before serving.
This Grinch Mini Cheesecakes recipe makes perfectly juicy, tender, and flavorful steak every time! Serve with potatoes and a side salad for an unforgettable dinner in under 30 minutes.
Preheat oven to 350 degrees F and line a 12-cup muffin tin with paper liners. Lightly spray liners with nonstick spray to ease removal.
Pulse about 10–11 Oreos in a food processor until fine crumbs form. Add melted butter and pulse until combined. Divide evenly into liners and press firmly to create a compact base.
Beat softened cream cheese with sugar until smooth. Add eggs one at a time, then vanilla. Mix until combined and smooth, scraping the bowl as needed to remove lumps.
Stir in neon green food coloring until desired color is reached. Spoon about 1/4 cup of filling into each crust-lined cup, smoothing tops for even baking.
Bake for 15–17 minutes until edges are set and centers slightly jiggle. Cool completely in the pan, then refrigerate for at least 2 hours to firm.
Top with whipped cream and festive sprinkles just before serving. For neat whipped cream, pipe using a star tip or chill briefly before piping.
Last Step: Please leave a rating and comment letting us know how you liked this recipe! This helps our business to thrive and continue providing free, high-quality recipes for you.
Leave a comment & rating below or tag
@royalrecipe on social media!

Learn how a 5-minute prep transforms a whole garlic bulb into silky, caramelized cloves in the air fryer. Perfect as a spread, mix-in, or flavor booster that elevates weeknight meals and party plates.
A bright, spicy and slightly sweet salmon dish finished with a creamy bang bang sauce. Ready in 15 minutes, it delivers restaurant flavor with weeknight ease.

A comforting, protein-packed twist on classic pot pie flavors, transformed into a creamy, one-pot soup that is perfect for weeknights and meal prep.
Leave a comment & rating below or tag @royalrecipe on social media!
Enjoyed this recipe? Share it with friends and family, and don't forget to leave a review!
This recipe looks amazing! Can't wait to try it.
Comments are stored locally in your browser. Server comments are displayed alongside your local comments.

Join to receive our email series which contains a round-up of some of our quick and easy family favorite recipes.